
Learning Area: Art
Time: 30-40 minutes
Grades: 1-5
September 15 is Dot Day, a celebration of art and creativity inspired by the book The Dot by Peter H. Reynolds.
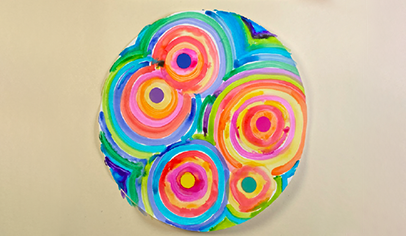
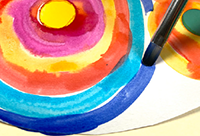
After reading the book The Dot, let your students know they will receive their own paper dot to paint in concentric circles, which are circles that repeat around one another, much like a target. Many artists use concentric circles in their work. Look at the artists Alma Thomas and Wassily Kandinsky for inspiration. Students will enjoy examining and talking about their work before starting on their own.
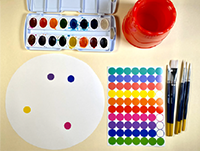
Materials
• Prang® Mixed Media Circles, 200 sheets, 9″ diameter, P4822
• Prang® Oval Watercolors, X16000
• Prang® Paint Brushes, 4 count, X94006
• Prang® Stable Water Pots, 6 count, X94007
• Prang® Markers, 12 count, X80012
• Dot stickers
• Water
Instructions
1. To begin the concentric circles, place 4-5 dots on your paper. Be sure to space them apart.
2. Using the flat Prang paintbrush, paint warm colors around one or more of your dot stickers. Students can ‘grow’ their circle by cleaning their brushes and going around their circle with a new color. Consider limiting students’ palette of paint to help prevent muddied watercolors.
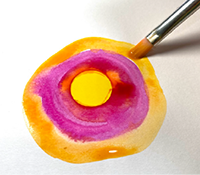
3. Encourage the colors to touch as they are applied. But be prepared for students to be amazed when they see colors mixing!
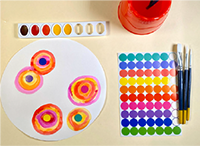
4. Once students are halfway through painting, have them venture on a gallery walk to examine one another’s work.
5. The following art class can introduce students to a cool color palette. Remind them of the steps to creating concentric circles. Allow them to finish their masterpiece.
Teacher Tips:
- Did you know Prang watercolor paints are completely customizable? You can purchase empty watercolor trays to create palettes for your students. In this lesson, you could have students use an all warm palette one day and a cool palette the next. It’s that easy!
- Did the papers curl when they dried? Try ironing them! Flip the artwork over and iron on a light setting. Pick up an inexpensive iron the next time you are at the thrift store. Or simply place works of art under a stack of heavy books for the night!
Alternative Lesson Idea
No paint? No problem! Prang markers are a great alternative to watercolor:
1. Have students place stickers on their dots the same way as the watercolor lesson.
2. Instead of painting around their dots, have them color around the dots with markers. It would be best to do this in ROY G BIV order for a beautiful color-mixing effect.
3. Once complete, just add water! With a paintbrush and water, have students paint around the maker. Notice how the marker turns into a vibrant paint!
4. Before dots dry, try adding a sprinkle of table salt. Allow this to dry on the artwork. It adds a beautiful snowflake effect!